Set up & Integrate
Learn how to set up and integrate your Hosted Checkout.
The key steps to getting your Hosted Checkout working:
- Create a checkout by generating a payment link.
- Construct the payment link by appending it to the environment you wish to target and present it to the customer.
- Handle the redirect to present payment confirmation to the customer.
- Use webhook notifications to update your merchant systems.
Also important:
- How to save card details from a customer's checkout, to power recurring transactions or a one-click checkout experience.
- Common checkout payment flows will help determine what gets displayed to customers and the resulting behaviour of the checkout, depending on what details are provided initially.
Creating a Hosted Checkout Session
Create a Hosted Checkout session by first generating a payment link which contains details of the order or payment and then construct a payment link that can be shared with customers.
Generate a payment link
Make an API request to our payment-links endpoint to generate a link_id.
Request:
{
  "transaction": {
    "order_id": "unique_order_id",
    "amount": 15.02,
    "currency": "gbp"
  }
}
Response
{
  "status": "success",
  "link_id": "4b0a3a3d-b53c-c805-e15a-82ba6583cca4"
}
Construct the payment link
Add the returned {link_id} to the environment that you wish to target. This is how the above example would look in the production environment - https://pay.acquired.com/v1/4b0a3a3d-b53c-c805-e15a-82ba6583cca4
Then share the resulting payment link with your customer through email, SMS, with a website link or through other channels.
QA URL: https://test-pay.acquired.com/v1/{link_id}
Production URL: https://pay.acquired.com/v1/{link_id}
Handling the customer redirect
When the user has completed payment they will be redirected to a payment outcome page. This redirect can be handled by Acquired.com or by you.
- When the Redirect URL is Enabled then Acquired.com will present the customer with our own hosted payment outcome screens.
- When the Redirect URL is Disabled then Acquired.com will send a form POST to the
redirect_urlconfigured in the Hub, unless a different URL is provided in the payment-links request.
Configure your Redirect URL from within the Hub at Settings > Hosted Checkout > +Add Responses.
Acquired.com presents the payment outcome
When Acquired.com is Enabled to present the payment outcome, then customers will be presented with success or failure screens that are provided by Acquired.
From these screens, the customer will be given a route to return to your site if a redirect_url is included in your Hosted Checkout Settings. This redirect URL will be available as a hyperlink from the "Return to merchant" button on the payment outcome screen.
If no redirect URL is provided, then customers will have no way of returning to your site directly from the Acquired.com payment outcome screen.
Merchant handles the customer redirect
Receive a form POST
To present customers with the payment status, Acquired.com will send a form POST to the redirect_url in format application/x-www-form-urlencoded.
status=executed&transaction_id=1970f4e1-95da-4859-b275-e9ac83f05eb1&order_id=your_unique_reference_1&order_active=undefined×tamp=1657183950&hash=d201a2ed66573043ff0b210de295c3d565b70aa1ffb35534bd29ce77a5987f14
The keys and values that will be present:
| Field | Type | Description |
|---|---|---|
status | string | The final status of the payment. For a list of all possible statuses see here. |
transaction_id | string | UUID assigned by Acquired.com. |
order_id | string | The order ID value that was passed in the payment-link request. |
order_active | boolean | Whether the order ID is still active or not, and whether payment can be reattempted by the same payment link. |
timestamp | integer | Exact date when response was posted to the redirect URL in UNIX timestamp format. |
hash | string | A calculated hash value which can be used to verify the integrity of the data. |
Verify the integrity of the form data
A hash value will be calculated every time a customer is navigated to the redirect_url. This allows you to guarantee the authenticity of the data.
To do this, generate a new hash value and compare it to the returned hash value. If the hash values match then the data has not been altered and the origin and integrity of the data has been verified.
Signing keys instead of app_keysWe no longer use app_keys for integrity checking hashes. Please ensure you update your integrity checking to handle the new edge cases and read more about signing keys.
To calculate the hash value, you'll need to do the following:
-
Concatenate the parameters in this order: status . transaction_id . order_id . timestamp
`executed1970f4e1-95da-4859-b275-e9ac83f05eb1your_unique_reference_11657183950` -
SHA256 encrypt the resulting string.
`4e9ce34004008830e672aa826efd5ddf56130ad127c279751135d48291b5f007` -
Append your
signing_keyvalue to the hash value of a string.`4e9ce34004008830e672aa826efd5ddf56130ad127c279751135d48291b5f007signing_key` -
SHA256 encrypt the resulting string again.
`4e7e127a6ab8e7c4d73100e0c959eb42e1d61adff6b641c6ea7e4690e44cbff0` -
Compare the generated hash value to the previous returned
hashvalue.
Webhook notifications
Webhooks should be used to update merchant applications with the final status of each payment, as opposed to the redirect form POST. Webhooks are server to server notifications unaffected by potential issues with the front end system and user error.
The webhook notifications will be sent to the webhook_url configured in the Hub Settings for Hosted Checkout, unless a different URL is provided in the payment-links request.
status_update webhook
status_update webhookThe primary webhook delivered for payments made from the checkout is the status_update webhook, providing the final status of payment requests. This webhook may also deliver notification of transitionary statuses outlined in the statuses page.
customer_new and card_new webhooks
customer_new and card_new webhooksIf the checkout creates a customer or card in the Acquired.com system, then a webhook notification will be delivered. See more about when the checkout will create a customer or card below.
Set up your payment methods
Managing the payment methods included on your checkout and customising the checkout page design is covered in Configure your Checkout.
You can also use the payment_methods array in the payment-links request to define which payment methods are offered in a specific checkout payment link. If the Enable custom payment method order toggle is enabled, you can also customise the order in which the payment methods appear.
Card payments
Nothing is required of merchants to get started with card payments on Hosted Checkout. If you want to authenticate payments using EMV 3DS though, you must add a contact_url in the Hub or in the tds object of your payment-links request.
One-off and recurring card payments are supported through Checkout. See recurring payments section for more details.
Apple Pay
Since the Hosted Checkout is fully hosted by Acquired.com, merchants will be automatically registered with Apple using our certificates and on the Hosted Checkout domain. Unlike a direct integration to Apple Pay, there's nothing required from merchants before accepting Apple Pay payments on Hosted Checkout.
One-off and recurring payments can be completed with Apple Pay through Checkout.
Apple Pay Domain Registration
If the registration with Apple doesn't complete automatically, then follow these steps:
- Navigate to Settings > Payment Methods > Apple Pay
- Under Web Domains, hit + Add Domain
- Enter the domain: pay.acquired.com (PROD) or test-pay.acquired.com (QA)
Testing Apple Pay
In order to test Apple Pay payments you need to be a tester using the Acquired.com Apple sandbox account. Please reach out to our integrations team via our Customer Support Portal if you want to test Apple Pay payments in sandbox.
For more information on testing different scenarios, please refer to our Testing Apple Pay guide here.
Google Pay
As with Apple Pay, nothing is required to add Google Pay to your Hosted Checkout as the checkout is fully hosted by Acquired.com. Note that your company website stored in Settings > Company Details will be included with each Google Pay payment request.
One-off and recurring payments can be completed with Google Pay through checkout.
It is important to note also that some merchants may not be able to access Google Pay, depending on their sector. See the Google Pay Policies For Business for more detail.
For information on Acquired.com's option for a direct integration with Google Pay, view our Google Pay guides.
Testing Google Pay
In order to test Google Pay payments, you must use the Google Pay test card suite. Ensure that google wallet is enabled on a Google Chrome browser and you will be able to test. For more information on testing different scenarios, please refer to our Testing Google Pay guide here.
Pay by Bank
Offering Acquired.com's proprietary Pay by Bank solution as a payment method in the checkout alongside cards and digital wallets like Apple Pay gives customers incredible choice to pay how they want.
Changing the order of payment methods
The payment_methods array can be used to configure the order of payment methods displayed on the Checkout page. You must first enable the 'Custom Payment Method Order' toggle in the Hosted Checkout settings.
If a payment method is unavailable, the next method in the sequence will be show automatically.
Saving card details (tokenisation)
If you want to save (i.e.: tokenise) customer card details to be used later for recurring payments, or to offer returning customers a one-click checkout, the Hosted Checkout makes things easy by handling the saving of card details for you. Continue reading to find out what's required in order to enable this functionality.
Recurring payments
In order to process recurring payments from checkout, is_recurring flag must be "true" in the payment-links request. You must provide a customer_id for an existing customer. Learn more about the creation of Customers from Hosted Checkout here.
If these conditions are met, the customer is given notice that their card details will be stored to process future payments.
Acquired.com enhances recurring payments by Network Tokenisation to improve security and conversion; read more about it here. When enabled, Network Tokenisation is applied automatically to Hosted Checkout payments.
Recurring payment methodsRecurring payments can be completed by Cards, Apple Pay and Google Pay through Hosted Checkout.
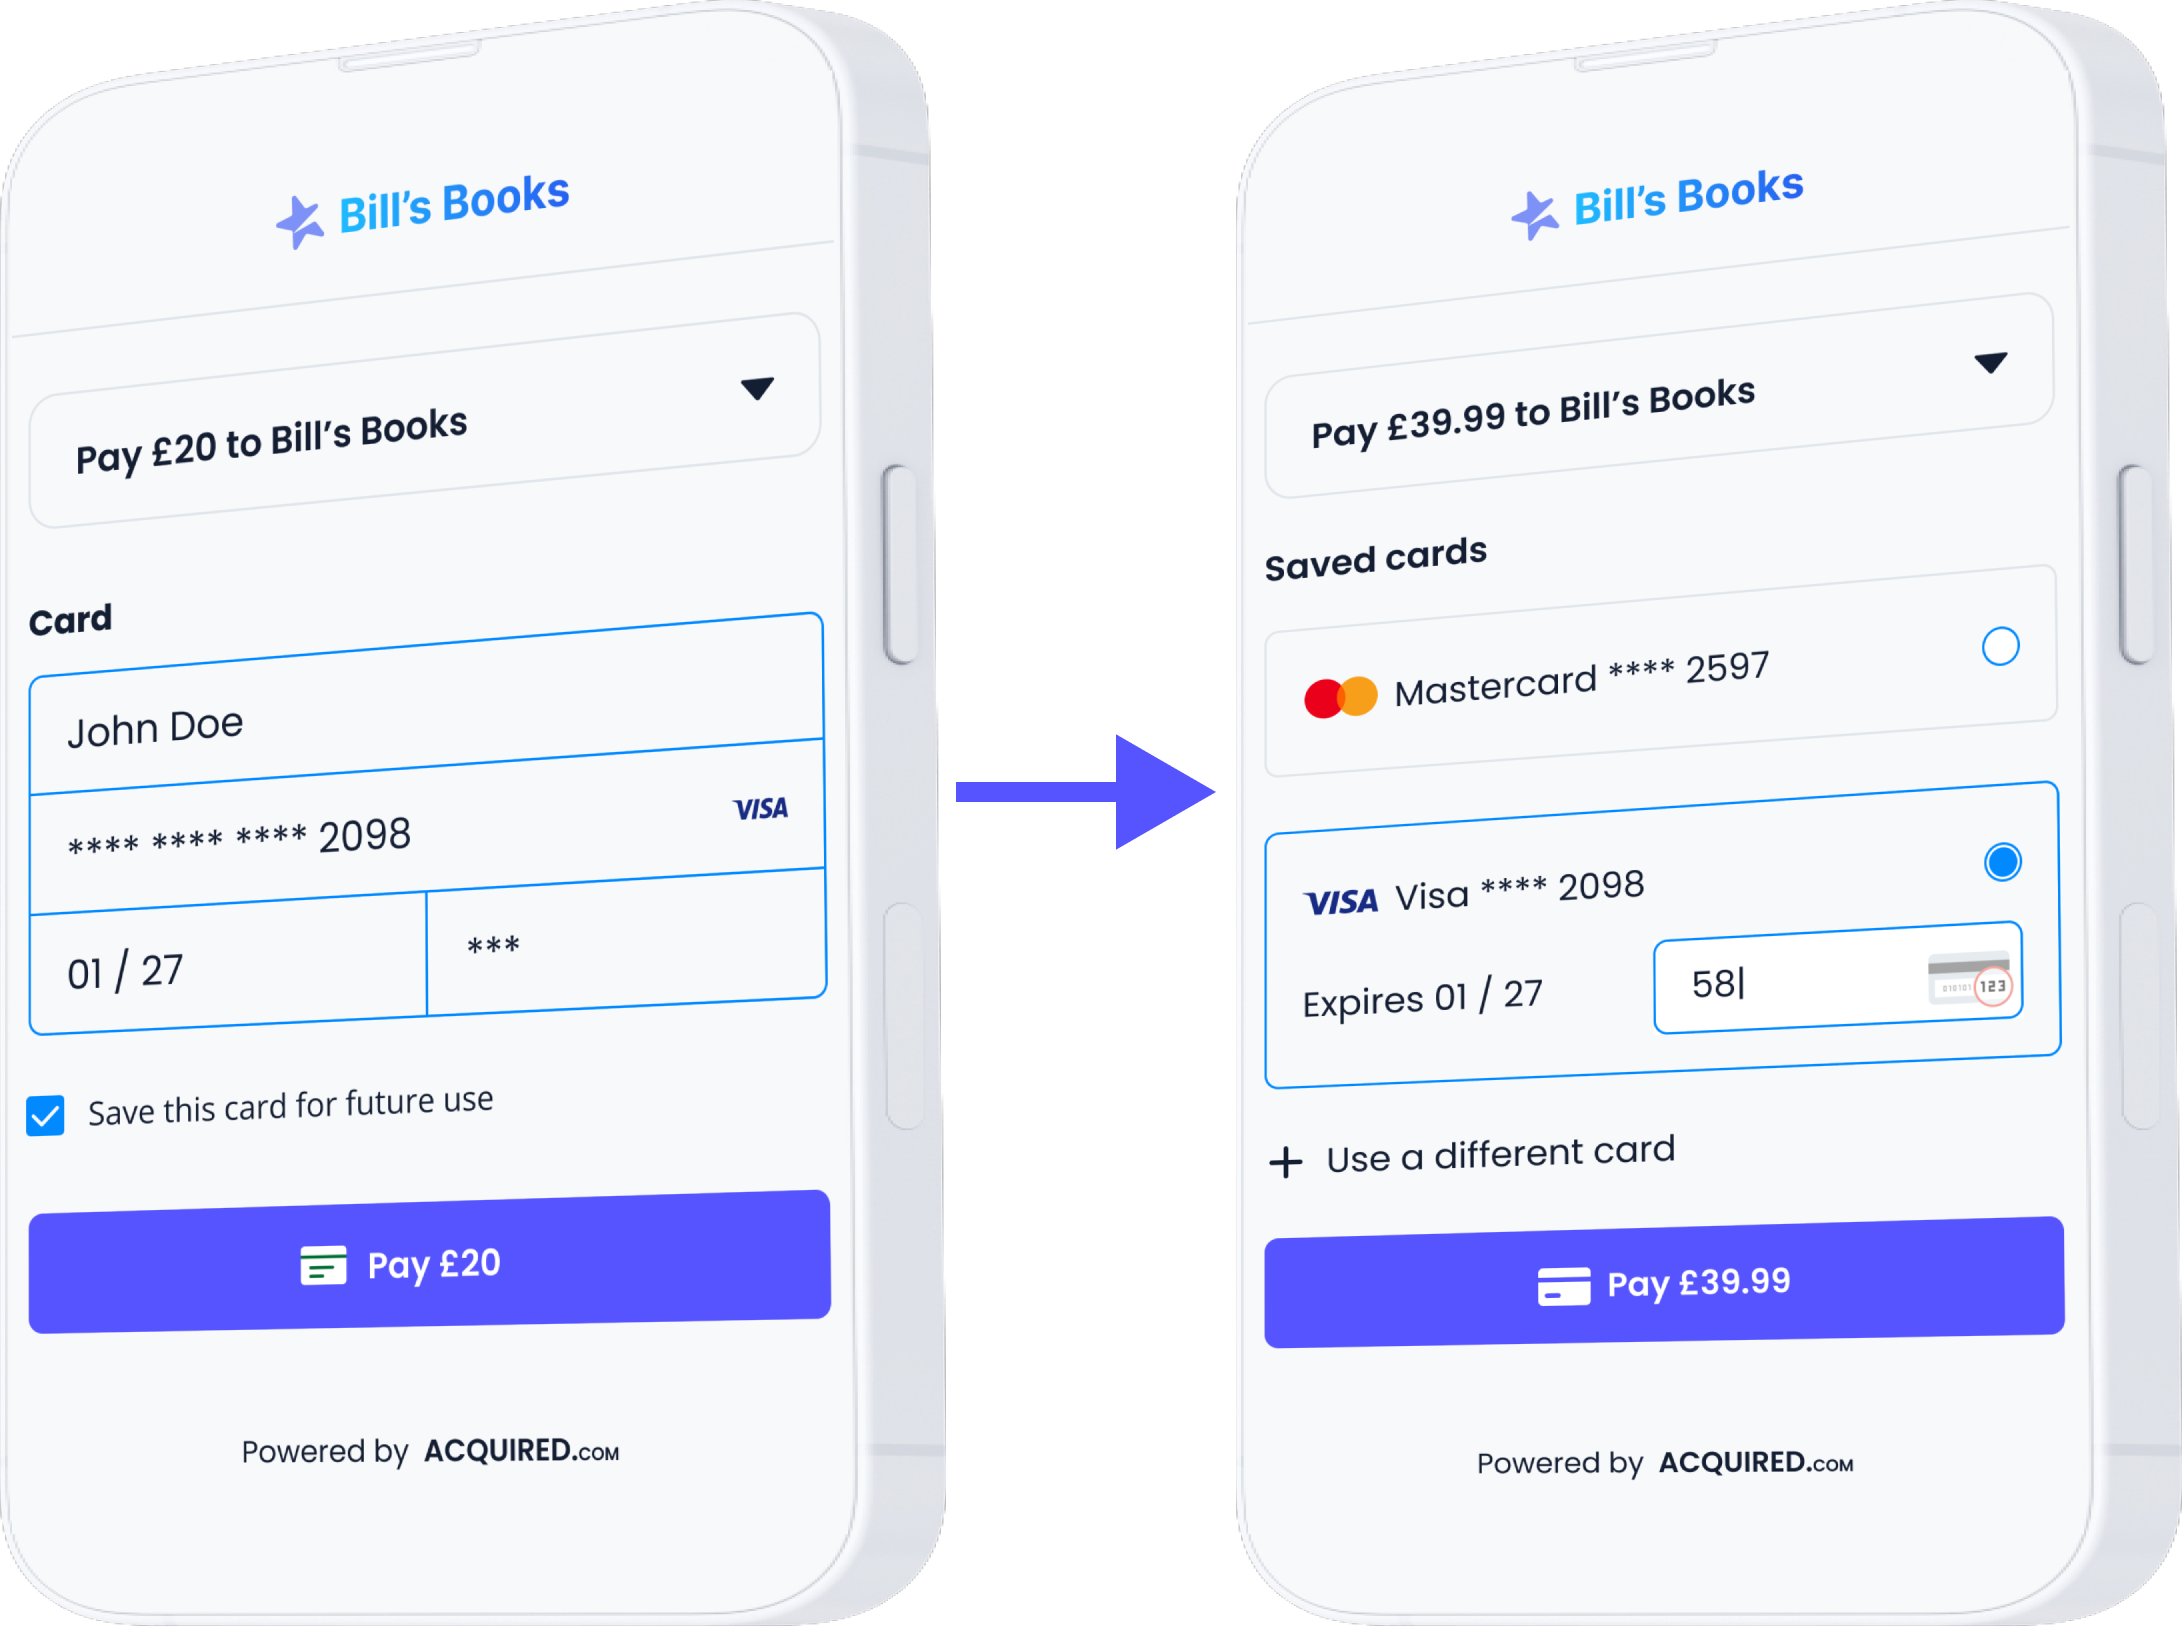
One-click checkout
If a returning customer is checking out and they have existing cards saved in the Acquired.com system, they will be presented with a one-click checkout page which requires only the card's security code to complete payment.
To enable this, make sure the 'save cards' option in Settings > Hosted Checkout > Cards Settings is turned on. When enabled, customers will be offered an opt-in checkbox to save their card details at checkout.
Defining the card_id
card_idFor merchants managing customer cards in their own systems, you can define the card_id that a customer can complete payment with in Checkout. In contrast to the one-click checkout process where all cards linked to the customer_id are presented, this approach allows merchants to streamline the checkout process by displaying a single card. The customer can then input the security code to complete payment. To implement this method, submit the required card_id within the payments object of your /payment-links request.
Creating customers and cards
Saved card details must be associated to a customer_id in the Acquired.com system, as all cards, payments and transactions are linked back to a customer.
Read more about the importance of the Customer resource to the Acquired.com API here and how it works for Hosted Checkout specifically here.
Creating a new Customer ID
The first step in processing a payment for a new customer is to create the customer record. Submit a request into the /customers endpoint and you will be returned a customer_id. You can then include the customer_id in the /payment-links request along with the payment details.
When a customer_id is provided in the payment links request to reference an existing customer, then any new card_id will be created against that customer_id.
Creating a new Card ID
To enable the saving of card details, turn on the 'save cards' option in Settings > Hosted Checkout > Cards Settings. When enabled, customers will be offered an opt-in checkbox to save their card details at checkout.
A card_id will be created only when the customer completes a successful payment.
New customer and new card webhooks
Whenever a new customer_id or card_id is created by the checkout, a webhook notification will be sent to the webhook_url configured in the Hub, unless a different URL is provided in the payment-links request.
Going Live with Hosted Checkout
Before going live with your Hosted Checkout integration, make sure to review our go-live checklist specifically designed for Hosted Checkout to ensure a smooth transition to production.
Updated 7 months ago