Authentication
Learn how to authenticate with the Acquired API.
Acquired uses the OAuth 2.0 authorisation framework to grant applications access to our resources. This authentication method requires you to pass a bearer token value in the HTTP authorization header of your requests, which you can generate by passing your client credentials through the login endpoint.
NoteAcquired only accept an API request to the /login endpoint from IP Addresses in IPv4 format.
Each developer will have their own app_id and app_key that they will use to log into the API. At this point we check that their details are correct (i.e from a known IP address) and process and return an access token. It is important to note that access tokens are valid for 1 hour, after that time a new token will need to be generated. The developer can then use this access token to authenticate themselves and log into the API. IP addresses must be added to the allowlist in order to access the API, if not access will be denied.
NoteYou will have different keys for both the test and production environments, you will only be able to authenticate with the specified endpoint.
Authorisation flow
See the below diagram demonstrating our authorisation flow:
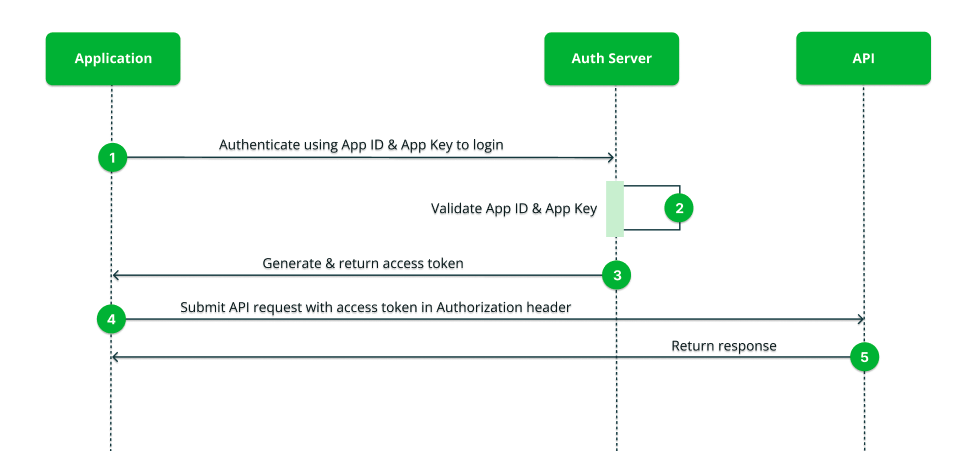
Authenticate with our API
Authentication URLs
QA URL: https://test-api.acquired.com/v1/login
Production URL: https://api.acquired.com/v1/login
NotePlease view our create an
access_tokenreference guide for further information on our /login endpoint.
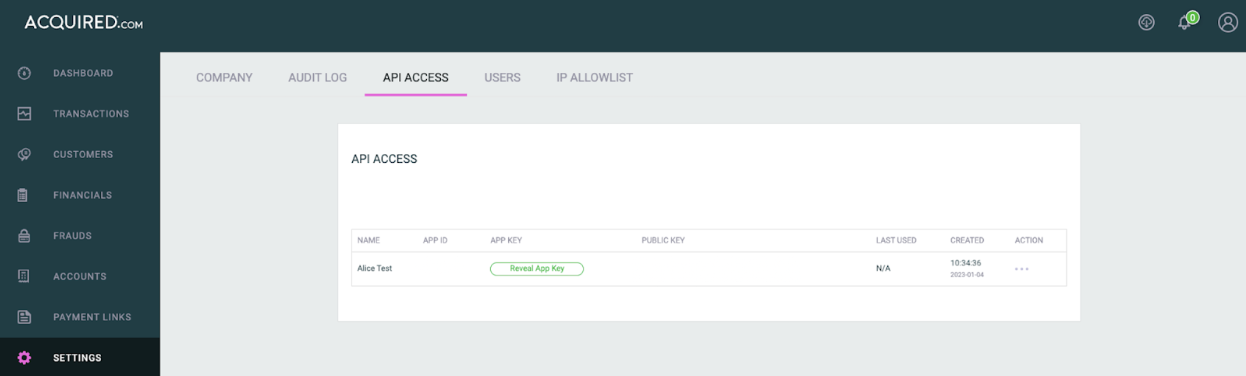
Step 1: Obtain your app_id and app_key values
app_id and app_key valuesThe first thing you will need to do is locate your app_id & app_key which will be used to request an access token.
- Firstly, log into the Hub.
- Navigate to Settings > API Access.
- Click into the
app_keyfield to expose theapp_key. - Copy and paste both values which can then be used within the code.
Step 2: Retrieve an access token from the authorisation server
Before your application can access our API, it must generate an access_token value.
Populate the app_id and app_key values with your client credentials.
Request:
{
  "app_id": "98434376",
  "app_key": "843a8fjei768fa...."
}
Response:
{
    "token_type": "Bearer",
    "expires_in": 3600,
    "access_token": "{token}"
}
Step 3: Send the access token to the Acquired.com API
After your application retrieves an access token, it can access our API.
Pass the token through to the resource in a authorization request header.
The token expires after 1 hour, however, you may chose to generate a new one for every request.
Step 4: Obtain a new token (if required)
Access tokens have a limited timeframe of 1 hour. If your application is returned a 401 Unauthorized then your current access token may have expired.
In the case that you receive a 401 error response, obtain a newaccess_token (as per step 2).
See below for a sample response body:
{
    "status": "error",
    "error_type": "unauthorized",
    "title": "Authentication with the API failed, please check your details and try again.",
    "instance": "/v1/payment-link"
}
Step 5: Make your first API request
You now have the required information to make your first API request!
Creating Multiple App IDs
The API Access section of the Hub provides merchants with the ability to securely manage multiple app_id values under a single merchant profile. This functionality ensures flexibility in handling API credentials while maintaining platform security.
Creating a new app_id
app_id- Navigate to the API Access section of the Hub.
- Click the Create App ID button.
- Provide a unique App Name in the modal that appears. App Names must adhere to validation rules and be unique within the merchant profile. If the name is not unique, an error message will appear:
The App Name must be unique. Please choose another value. - Once created, the new app_id will appear in the list and will be set to Not Active by default.
- The
app_keyfor the newapp_idcan be viewed or revealed using the existing functionality in the Hub.
Managing Existing App IDs
Each app_id in the list has an Actions menu (represented by a three-dot icon) for management.
Options for Active App IDs:
- Edit App Name: Allows merchants to update the App Name while ensuring uniqueness.
Options for Inactive App IDs:
- Edit App Name: Update the App Name with the same validation rules.
- Set to Active: Activates the selected
app_id, automatically deactivating the currently active one. - Delete App ID: Removes the selected
app_idfrom the system (requires confirmation).
Activating an app_id
app_idTo activate a newapp_id, follow these steps:
- Set to Active in the Actions menu for the desired inactive
app_id. - A confirmation modal will appear with the following message:
Setting this App ID to active will deactivate the currently active App ID. Only one App ID can be active at a time. Ensure your systems are updated to use the new credentials to avoid authentication failures. Do you want to proceed? - Click SET TO ACTIVE to confirm. The selected
app_idwill become active, and the previously active one will switch to inactive.
Deleting an App ID
Inactiveapp_id values can be permanently deleted using the following steps:
- Select Delete App ID from the Actions menu of the desired
app_id. - A confirmation modal will appear with the message:
"Deleting this App ID is permanent and cannot be undone. The App ID will no longer be able to authenticate with the platform. To confirm, please type 'DELETE' in the box below." - Enter DELETE in the text box and click Delete APP ID to proceed.
Updated about 1 month ago