Creating your Components
Understand how to configure your desired Component integration: Form, Fields or Payment
Overview
Once you have successfully initialised the Acquired.js object within your script, the next step is to choose the right component form for your business. Acquired provides three solutions for achieving this:
- Form: Use a single form to implement the Components solution.
- Payment: A payment form that allows for a quicker and more efficient checkout process by displayed pre-stored card options for returning customers.
- Fields: Utilise individual components to construct a solution that aligns with your requirements.
Option one: Form
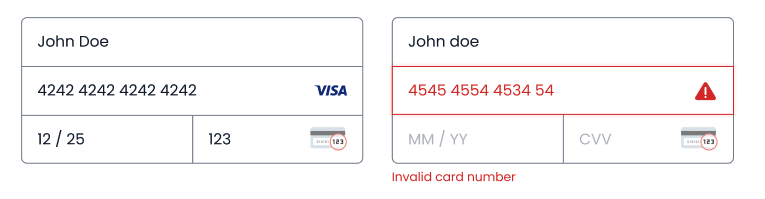
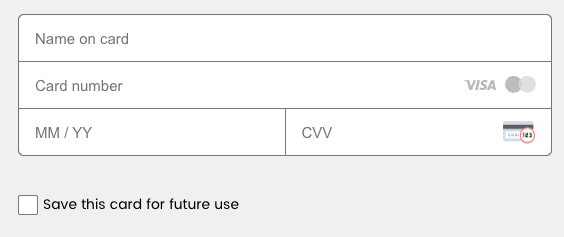
Acquired's form solution consolidates all necessary components into a single form, facilitating streamlined checkout construction.
The HTML code represents the Acquired js DOM, representing the structure of the webpage. It includes each form element and the components contained within the div.
Example:
<form id="card-form" class="form-main">
    <div id="payment-component"></div>
</form>
With our form solution, you can create the component, which contains all the required card fields, and then mount it in your checkout.
Example:
const paymentComponent = components.create(‘cardForm’, {
   style: style
});
paymentComponent.mount('#payment-component');
NoteWe have also built the ability to save cards for the Form integration, please refer to our Returning Customers guide for more information.
Returning Customers - Form
We have also built a returning customers flow into the Form component integration. To utilise this option when generating the payment session pass the save_card parameter and set to true. This will display the option to 'save this card for future use' in the checkout.
Payment sessions example:
{
  "transaction": {
    "order_id": "41142534-2e55-4eb2-9553-59784c73b2b0",
    "amount": 15.02,
    "currency": "gbp",
    "capture": true,
    "save_card": true
  },
  "tds": {
    "is_active": true,
    "challenge_preference": "no_preference",
    "contact_url": "https://yourdomain.com/contact",
    "redirect_url": "https://yourdomain.com/redirect"
  }
}
When selecting the tickbox, a card_id will be returned within a successful response.
{
  "status":"success",
  "transaction_id":"018ef111-67c4-7306-ab68-012d17bfff4a",
  "order_id":"store-iframe-56546745745676",
  "timestamp":1713441433,
  "card_id":"018ef104-2b90-73d5-b9a3-e287da170b6e"
}
When a customer returns to complete the payment, you can include the card_id in the payment session, similar to the Fields solution. This allows you to utilise the cardCvv component to securely capture the CVV during the payment process.
const cardCvvComponent = components.create('cardCvv', {
    style: style
});
cardCvvComponent.mount('#card-cvv-component');
Option two: Payment Form
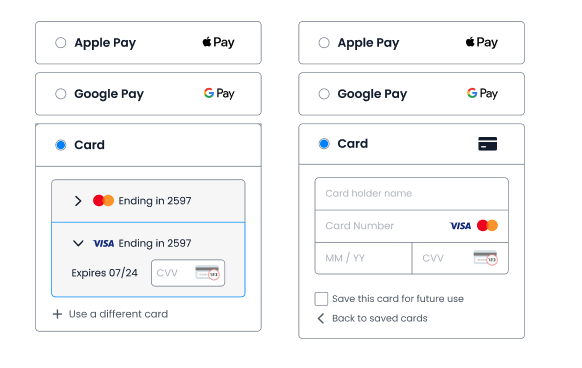
The payment component incorporates the functionality of storing card details. When a returning customer visits the merchant's website, the payment form will display a list of previously saved cards that are associated with the customer_id. If a previously stored card is selected as the payment method by the customer, they will only be prompted to enter the CVV value, creating a smoother checkout experience.
As well as using a previously stored card, the customer will also have the option to "+ Use a different card". If the customer selects to pay with a different card, the payment form utilises the same logic as the card form and only displays the form as a single component (rather than the Individual components solution). By default, the most recently created card will be displayed first. To save a card for future use, pass is_recurring when creating the session.
If there are no previously stored cards against the customer, we will display the card form.
The payment form includes support for both Apple Pay and Google Pay payment methods. To support these payment methods, utilise the payment_methods array when generating the session_id.
{
  "transaction": {
    "order_id": "41142534-2e55-4eb2-9553-59784c73b2b0",
    "amount": 15.02,
    "currency": "gbp",
    "capture": true,
    "save_card": true
  },
  "is_recurring": true,
  "tds": {
    "is_active": true,
    "challenge_preference": "no_preference",
    "contact_url": "https://yourdomain.com/contact",
    "redirect_url": "https://yourdomain.com/redirect"
  },
  "payment_methods": [
    "card",
    "apple_pay",
    "google_pay"
  ]
}
NoteThe above
/payment-sessionexample includes all the possible parameters that can be included in your request. In reality you would not pass both thesave_cardandis_recurringparameters in the same request.
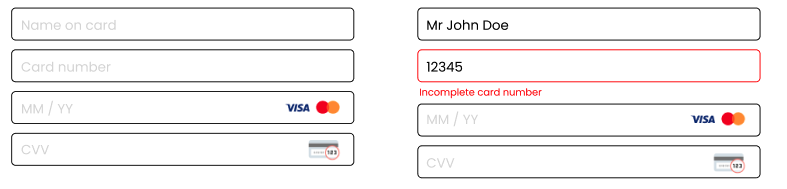
NoteThe payment form adopts the identical error messaging format as the card form, mirroring the style showcased in the card form images.
The first step is to build your payment form, and confirm the components to be included within the <div>.
<form id="payment-form" class="form-main">
  <div id="payment-component"></div>
</form>
Then you can create and mount the payment form.
const paymentComponent = components.create('payment', {
  style: style
});
paymentComponent.mount('#payment-component');
Setting up Apple Pay and Google Pay using the Payment Form
Apple Pay
In order to accept Apple Pay via Acquired.com, you need to register your domains within the Hub.
- Login to the Hub.
- Navigate to Settings > Payment Methods > Apple Pay.
- Under Web Domains, hit + Add Domain.
- Enter the domain that you wish Apple to provide access for.
- Click to Download Verification File.
- Host the file at - https://[DOMAIN_NAME].well-known/apple-developer-merchantid-domain-association
- Click Register Domains.
Google Pay
In order to accept Google Pay payments, you need to add your merchant ID.
- Log into the Hub.
- Go to Settings > Payment Methods > Google Pay.
- Click + Add Merchant ID and enter your Company ID value assigned by Acquired.com.
Option three: Fields
Acquired’s fields solution allows you to create your own card form, defining the components that you want to display within your checkout.
Unlike the two previous forms discussed above, the payment-component contains multiple individual fields that can be created and mounted.
NoteWhen utilising the Fields solution, you have the option to tokenise card details for future use. For more details, please consult our Returning Customers guide.
Firstly, confirm which fields you want to display in your payment form by inputting the required fields within your code.
Example_(the input fields can be named according to your preference)_:
<form id="individual-form" class="form-main">
   <div id="payment-component">
     <div class="input-field" id="card-holder-component"></div>
     <p class="component-error"></p>
     <div class="input-field" id="card-number-component"></div>
     <p class="component-error"></p>
     <div class="input-field" id="card-expire-date-component"></div>
     <p class="component-error"></p>
     <div class="input-field" id="card-cvv-component"></div>
     <p class="component-error"></p>
   </div>
</form>
The next step is to create the individual components and mount them into your checkout.
const cardNumberComponent = components.create('cardNumber', {
   style: style
});
cardNumberComponent.mount('#card-number-component');

const cardholderNameComponent = components.create('cardholderName', {
    style: style
});
cardholderNameComponent.mount('#card-holder-component');

const cardExpireDateComponent = components.create('cardExpireDate', {
    style: style
});
cardExpireDateComponent.mount('#card-expire-date-component');

const cardCvvComponent = components.create('cardCvv', {
    style: style
});
cardCvvComponent.mount('#card-cvv-component');
NoteYou can still utilise Apple Pay and Google Pay through the individual; Fields, by a direct integration. Please refer to our Apple Pay and Google Pay guides for further information.
Returning Customers - Fields
When utilising the Fields implementation of components to store card details for future use, you can include a field called create_card and set it to true in the confirmParams object. You must also include either customer.customer_id or customer.reference to associate the card with the customer when generating a payment session.
confirmParams example:
const confirmParams = {
  payment: {
   create_card: true
  }
}
Payment session example:
{
  "customer": {
  	"customer_id": "96f450f4-99d4-4e73-9751-24e676b7c814"
 }
}
A card_id will be returned with a successful response.
{
  "status": "success",
  "transaction_id": "018ef104-2af9-7319-8f62-13cdbc032756",
  "order_id": "store-iframe-64565476576",
  "timestamp": 1713440566,
  "card_id": "018ef104-2b90-73d5-b9a3-e287da170b6e"
}
When the customer returns to make a payment, pass the saved card_id when generating the payment session in the payment object. Display only the cardCvv component to securely capture the CVV transaction completion.
Payment session example:
{
  "payment": {
    "card_id": "018ef104-2b90-73d5-b9a3-e287da170b6e"
  }
}const cardCvvComponent = components.create('cardCvv', {
style: style
});
cardCvvComponent.mount('#card-cvv-component');Updated about 1 year ago