Optimising the Checkout Experience
Optimise Hosted Checkout to reduce friction, boost conversions, and guide customers toward your preferred payment method.
Hosted Checkout can be configured to improve conversion rates and encourage customers to use your preferred payment method. This page outlines the key settings and features you can use to optimise your checkout experience.
Customise Your Checkout Page Design
You can customise your Hosted Checkout to align with your brand by adding your logo and updating the colour scheme.
Creating a Custom Template
- Log into the Hub and navigate to Settings → Hosted Checkout.
- Click + Customise to create a new template.
- Enter a Template Name.
- Add your custom elements, such as:
- Logo
- Background colour
- Header colour
- Click Save — the new template will appear in the Customisation table.
Accepted Logo Size
Logos are limited to a maximum height of 40px. If your uploaded logo exceeds this, it will be resized automatically.
Setting Your Default Template
Once you've created a template, it can be set as the Default Template via the Actions menu in the Customisation table.
There is no limit to the number of templates you can create, but the Default Template will always be applied to the Checkout page unless you specify otherwise.
Updating Your Default Template
- In the Hub, go to Settings → Hosted Checkout
- In the Customisation table, click the action ellipsis on the template you want to use.
- Select Set as Default Template.
- Process test transactions in Hosted Checkout.
Using Multiple Templates
If you want to present different templates for different customer groups, you can specify which one to use by passing the template_id in your /payment-links request.
The template_id is a GUID obtained from the Customisation section in the Hub.
Example:
{
  "transaction": {
    "order_id": "your_unique_reference_1",
    "amount": 14.99,
    "currency": "gbp"
  },
  "template_id": "92351a6c-45b1-456e-8430-0969dce843ea"
}
Enabling One-Click Checkout for One-Off Payments
Passing a customer_id in your /payment-links request for a one-off payment scenarios allows Hosted Checkout to recognise returning customers and display any saved payment credentials linked to that customer.
If a saved card exists, the customer will see a one-click checkout screen — all they need to do is enter their card’s security code (CVV) to complete the payment. This removes friction, speeds up the checkout process, and can significantly improve conversion rates.
Why enable this?
- Faster payments — customers skip re-entering card details.
- Higher conversion — fewer drop-offs at checkout.
- Better experience — makes repayments or repeat purchases seamless.
How it works:
1. The customer makes a payment and chooses to save their card.
2. On their next one-off payment, Hosted Checkout recognises them via customer_id.
3. They complete payment in seconds by entering just their CVV.
Setup requirements
Enable Save Cards in the Hub:
Settings → Hosted Checkout → Card Settings → Toggle 'Save Cards' ON
When enabled, customers will see an opt-in checkbox at checkout to save their card details for future use.
Dictating the Order and Availability of Payment Methods
The order of payment methods in Hosted Checkout is determined by the payment_methods array in your /payment-links API request. The sequence in this array sets the order they appear to customers at checkout.
If a preferred method (e.g. Apple Pay or Google Pay) isn’t available due to the customer’s device or configuration, Hosted Checkout will automatically fall back to the next available method in the list.
The
payment_methodsarray controls both which methods are available and the order they’re shown. Include every method you want to offer, in your preferred priority.
Example: Prioritising Pay by Bank for a One-off Payment
{
  "transaction": {
    "order_id": "e93aaf85-af8c-a6ae-89ba-0867905f9123",
    "amount": 5.99,
    "currency": "gbp"
  },
  "payment": {
    "reference": "test"
  },
  "payment_methods": [
    "pay_by_bank",
    "apple_pay",
    "google_pay",
    "card"
  ]
}
In this example, Pay by Bank will appear first at checkout for the one-off payment scenario.
Setup requirements
Enable Save Cards in the Hub:
Settings → Hosted Checkout → Toggle 'Enable Custom Payment Method Order' on
Promote a Payment Method
You can configure Hosted Checkout to show your preferred payment method at the top of the page and hide all other methods beneath a “See other methods” link.
This allows you to promote the method you want customers to use most, while still giving them the option to choose an alternative. When the customer selects See other methods, the remaining payment options will be expanded and displayed.
When enabled:
- The first payment method in your
payment_methodsarray will be displayed by default. - All other included methods will be collapsed beneath the fold.
- Customers can view them by selecting "See other methods".
Example:
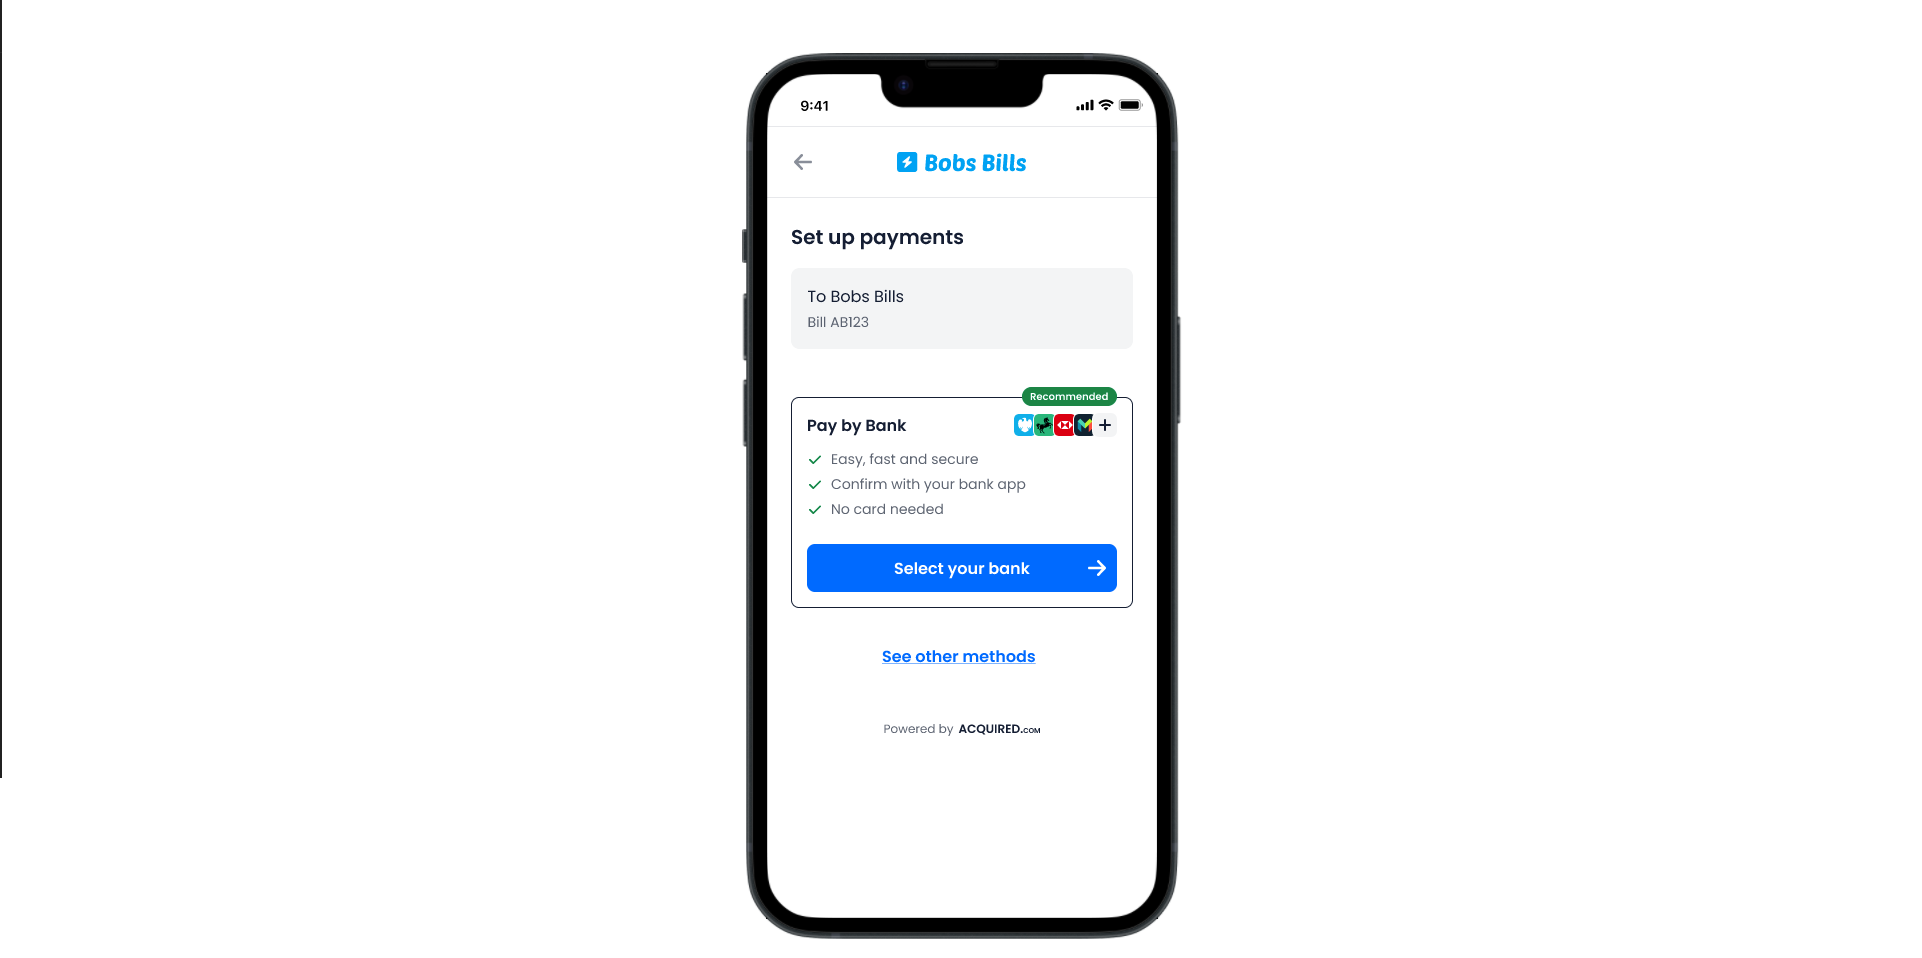
Note: You must still include all payment methods you want to make available in your
payment_methodsarray. Hidden methods will not be offered if they’re not in the array.
Setup requirements
Enable Promote a Payment Method in the Hub:
Settings → Hosted Checkout → Toggle 'Promote a Payment Method' on
Pay by Bank - Update Button Display Style
You can now configure how the Pay by Bank button is displayed in Hosted Checkout.
This lets you choose between a Simple button (clean, minimal) or an Expanded button that highlights the benefits of Pay by Bank.
Button Styles
- Simple Button – displays the standard Pay by Bank button only.
- Expanded Button with Benefits – renders a larger button with supporting text.
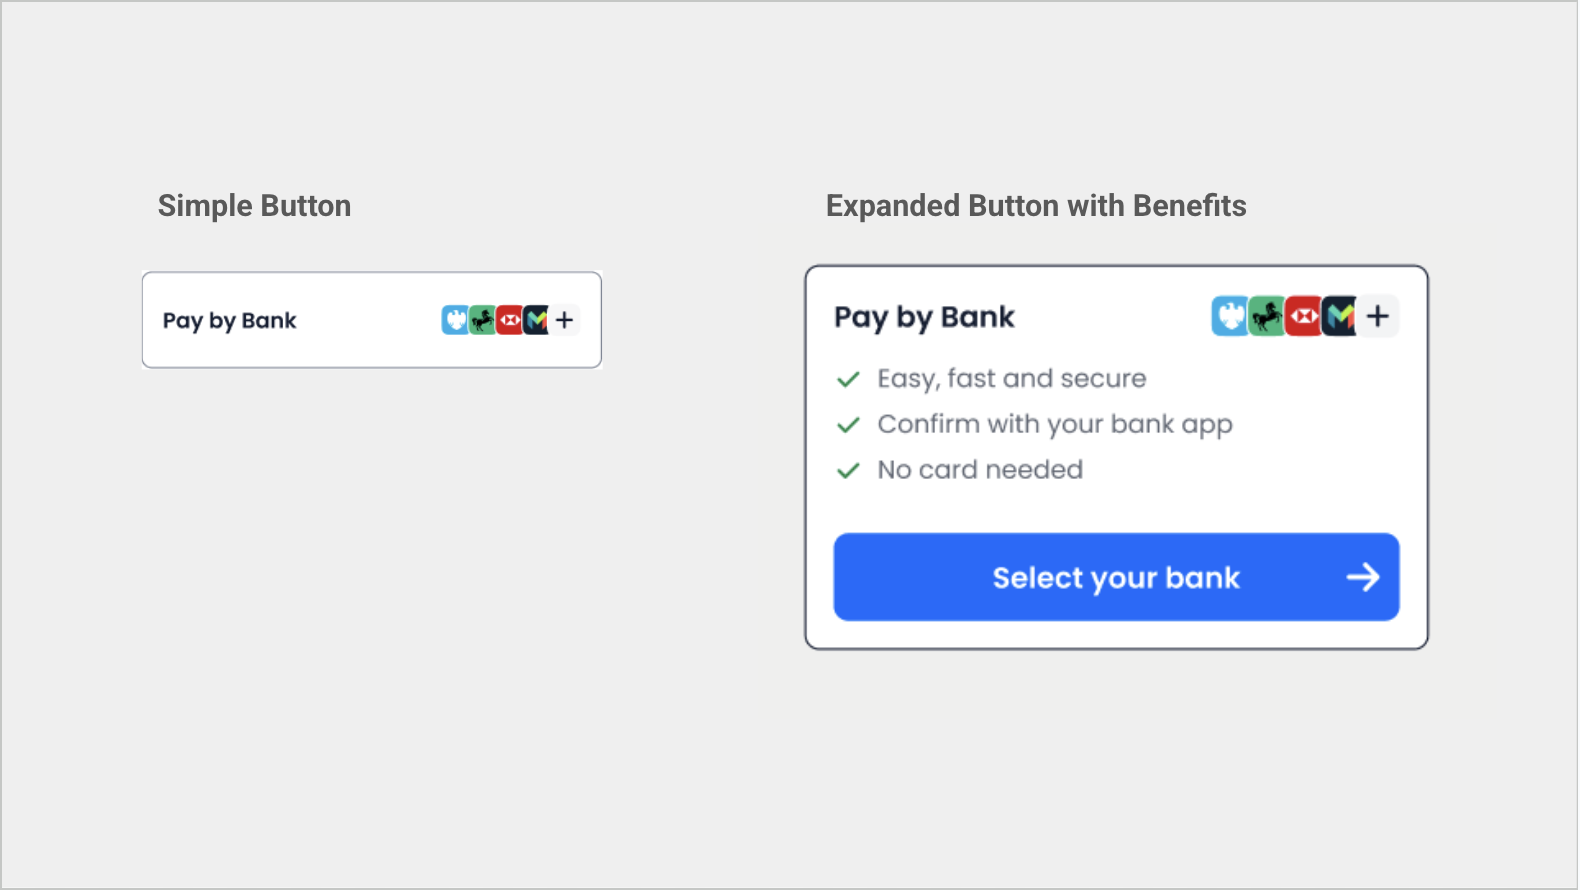
Setup requirements
Enable and configure this option in the Hub:
Settings → Hosted Checkout → Pay by Bank Settings → Button Display Style → Select preferred button option → Select save
Update the Payment Call-to-Action
The text displayed on the payment submit button can be customised to better match the transaction type. The default is “Pay Now”, but you can change it to Buy, Checkout, Donate, Register, or Subscribe on each checkout page by using the submit_type parameter in your payment-links API request - see more details here.
Using the submit_type parameter will also update the text displayed in the Apple Pay and Google Pay buttons, overriding the default display option set in Hosted Checkout settings.
Updated 11 months ago